
Introduction
Connecting a garden hose to a tap is a simple yet essential task for any gardener or homeowner. Whether you’re watering plants, washing your car, or cleaning outdoor spaces, a properly connected hose ensures efficient water flow and prevents leaks. This guide covers everything you need to know about connecting your garden hose to a tap, including preparation, step-by-step instructions, troubleshooting tips, and maintenance advice.
Understanding the correct way to attach your hose can save you time, water, and frustration. We’ll answer common questions and provide expert tips to help you get it right the first time.
Why Properly Connecting a Garden Hose Matters
Connecting your garden hose correctly to the tap is more than just screwing it on. An improper connection can lead to water leaks, pressure loss, and damage to your hose or tap. Here’s why you should pay attention:
- Prevents leaks and water waste: A tight seal avoids dripping and conserves water.
- Maintains water pressure: Ensures steady water flow for effective watering.
- Prolongs hose and tap life: Avoids wear and tear caused by leaks or loose fittings.
Tools and Materials Needed to Connect Your Garden Hose
Before you start, gather the following:
- Garden hose with a threaded connector
- Outdoor tap (usually with a threaded spout)
- Hose washer (rubber seal inside the hose connector)
- Optional: Hose connector or adaptor (if tap and hose threads differ)
- Teflon tape (for extra sealing if needed)
Having these items ready will make the process smooth and efficient.
Step-by-Step Guide to Connecting Your Garden Hose to a Tap
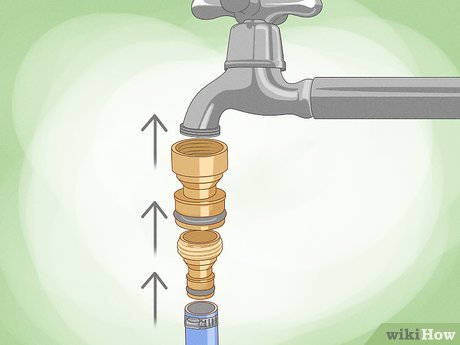
1. Check the Tap and Hose Fittings
First, ensure the tap has a compatible threaded spout, usually 3/4-inch BSP (British Standard Pipe) thread. Most garden hoses come with a matching connector, but some taps might need an adaptor.
2. Inspect the Hose Washer
Inside the female end of your hose connector, you’ll find a rubber washer. This washer creates a watertight seal. Replace it if it’s cracked or missing to prevent leaks.
3. Attach the Hose to the Tap
- Turn off the tap to avoid water flow.
- Screw the hose connector clockwise onto the tap’s threaded spout.
- Tighten by hand until snug. Avoid using tools as overtightening can damage the threads.
4. Test for Leaks
- Slowly turn on the tap.
- Check the connection for drips or leaks.
- If leaking occurs, turn off the tap, unscrew the hose, and apply Teflon tape to the tap’s threads before reattaching.
Common Issues and How to Fix Them
Leaking Connection
Leaks usually result from worn washers or loose fittings. Replace the washer or tighten the connection. If the tap’s threads are damaged, use an adaptor or consult a plumber.
Incompatible Threads
Some taps have non-standard or smooth spouts. In this case, purchase a hose adaptor or a tap connector designed to fit your tap type.
Low Water Pressure
Check for kinks or blockages in the hose. Also, ensure the tap is fully open and the main water supply pressure is adequate.
Tips for Maintaining Your Garden Hose Connection
- Store your hose properly: Coil it neatly and avoid sharp bends to extend its lifespan.
- Use hose washers regularly: Replace them annually or when worn.
- Winterize your hose: Disconnect and drain it before freezing temperatures to prevent damage.
- Inspect connections before use: Ensure fittings are tight and in good condition.
Conclusion
Connecting your garden hose to a tap is a straightforward process that ensures efficient watering and prevents water loss. By following the proper steps—checking fittings, using washers, and securing connections—you can enjoy hassle-free gardening and outdoor cleaning. Regular maintenance and timely repairs will prolong your hose’s life and keep your tap functioning well. Next time you need to connect your garden hose, remember these expert tips to get it right quickly and confidently.